I had a week off work, so I got to spend quite a bit of time working on the guitar build. Not as much as I would have liked because of the missing band saw parts, most of which
have still not showed up yet. Here are some pictures:
I cut out the mahogany back with a coping saw and got the braces installed and shaped. The back braces have a slight arch to them to give the back a subtle curve. The strip running vertically is thin basswood. It's light, but the grain runs perpendicular to the grain of the back.

Here are the top braces being glued in. The clamping technique here is called a go-bar deck. (Be careful if you Google that or you'll find lots of go-go bars). I've seen lots of custom jigs for how to do this, but I just used a shelf over my workbench as the top. The idea is to take flexible pieces of wood and wedge them between the top deck and the brace to be clamped. This works pretty well.
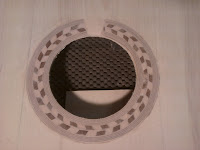
Here is the sound hole rosette installed. I was able to cut a slice off using a table saw. I think it would be a lot easier to cut with the bandsaw once I can use that. The two vertical lines you see are where the panels are glued. I wasn't able to get panels wide enough to do the whole top in 2 pieces, so I did it in thirds instead. The glue joint is tight enough, but the yellow Tightbond glue left a dark line. On the final build, I'm going to switch to a white glue that dries clear, at least for any joint that will show.
Here is the neck carved and ready to install. I actually did this part before I started blogging about it. The neck is maple, which is available locally. The slots for the tuning pegs would be a lot easier to do with a drill press, but I don't have one so I used a brace and bit with a 1/2" auger bit. This worked pretty well, but the bit slipped a couple times on the first slot causing it to be less straight than I would like.
When the switch guard for the band saw showed up, I was at least able to cut out the guitar shape on this form. I don't want to run it too much without the lower tire, as that will dull the blade.
The turnbuckles allow me to spread the blocks apart to press against the sides. Note that the left side is in the form now. If I were to make this again, I would leave the inside continuous instead of making it 3 pieces on each side. Or at least make the blocks on the lower bout bigger. When building this, I planned to replace the hook and eye that came with the turnbuckles with carriage bolts. However, I forgot that one side of the turnbuckle is threaded backwards, so the carriage bolts won't go in. I just cut a slot in the blocks and slipped the eye end in. I may epoxy these in some day.
This is my side bending pipe. I was trying to come up with a way of using an electric heating element to heat the pipe, but the smallest one I could find was 1400 watts, which comes out to about 12 amps. I wanted to use a light dimmer switch to control the temperature, but I couldn't find one rated for more than 1000 watts. I settled for the small propane torch. I bent one of the
practice sides that I bought from LMI. It worked pretty well, but you have to go slow and take it easy to avoid cracking the wood.. It also turns out that I need to fill the bottom pipe with sand or something. Otherwise, the torch blowing across the opening makes it resonate like blowing across the top of a Coke bottle. Of course, the guys at the organ shop who cut the sides for me will probably read this and say, "Well, duh!".
Additional update: I bent the mahogany sides that they cut for me. I should have asked for them to be thinner than 1/8" because they wanted to crack at the waist, but I managed to get them to bend without breaking. The practice sides from LMI were only .09". Soaking the sides also helped.

 Here are the top braces being glued in. The clamping technique here is called a go-bar deck. (Be careful if you Google that or you'll find lots of go-go bars). I've seen lots of custom jigs for how to do this, but I just used a shelf over my workbench as the top. The idea is to take flexible pieces of wood and wedge them between the top deck and the brace to be clamped. This works pretty well.
 Here is the sound hole rosette installed. I was able to cut a slice off using a table saw. I think it would be a lot easier to cut with the bandsaw once I can use that. The two vertical lines you see are where the panels are glued. I wasn't able to get panels wide enough to do the whole top in 2 pieces, so I did it in thirds instead. The glue joint is tight enough, but the yellow Tightbond glue left a dark line. On the final build, I'm going to switch to a white glue that dries clear, at least for any joint that will show.


