Monday, May 28, 2012

Starting Guitar Number 3

I finally started work on guitar number three this weekend.  When I ordered the supplies from LMI, I decided to make use of their "kit wizard".  This lets you select all the parts and gives you a 15% discount on the tonewood, a 10% discount on other materials and a 60% discount on shop services.  With that much of a discount on shop services, I spent the extra money to have them bend the sides and slot the fretboard for me.
I also purchased a pre-made rosette this time. I still have one left over from the first two guitars, but I wanted something nicer this time.  


For this guitar, I found some nice flame maple on eBay for the top. It's not big enough for a full-sized guitar, so I'm building a parlor sized guitar instead.


I'm also inlaying a bloodwood back stripe this time and the bindings are also bloodwood.  


I'm sticking with zircote for the fretboard and bridge.  Although I ordered a pre-made bridge, I didn't read it right and got a steal string bridge instead of a classical.  So I'll have to order another bridge or a zircote blank and make my own.  Bridges aren't that hard to make, so I'll probably just order a blank.

Saturday, May 26, 2012

Guitar Number Two

I forgot to blog anything about my second guitar build.  I managed to avoid the mistakes that I made on the first one but made some new ones this time. 

Serial Number 0002

  • Top: Sitka spruce
  • Back and Sides: Rosewood
  • Neck: Maple
  • Fretboard: Zircote
  • Bridge: Zircote
The rosette is the same as on the first guitar.

I was really happy with how this guitar was turning out until I went to glue on the bridge. I had masked off the bridge area with tape while shellacing the top.  When I removed the tape and double-checked the distance to the bridge, it was off by half an inch. I knew that if I tried to shellac the unfinished area it wouldn't come out looking right.  I had some more of the burly maple veneer that I used on the first guitar, so I cut a piece and glued it over the unfinished area.

So it looks kind of funny but, hey, it adds character, right?

Then I went to string it up and discovered that the neck was crooked. You can see it if you stand back or if you sight down the neck. I drilled a 7th string hole in the bridge and just shifted all the strings over one.

The finish came out beautiful on this one.  The French polishing technique is a lot of work, but the results look great.

So now I have to build a third guitar.  I'm going to keep doing this until I get it right.


Sunday, April 24, 2011

First Guitar Done!

Here's the final product. Well, not really.  I still need to tweak the frets a bit and I'm not completely done with the finish on the back and the sides, but I couldn't wait to string it up and see how it sounded.  Not bad for a first attempt.


Here are some more pictures of the construction.  The front and sides joined together.
Here I'm gluing on the kerfing strip. My kerfing is half inch ceder which I cut on the table saw. I'm not really happy with the way it came out. You can see a few blocks just left of the clamps where it chipped.  And it's hard to get the spacing even. I drew a mark on the surface of the table saw and tried to line a previous cut up with that line, but keeping that consistently accurate is hard. For the next guitar, I've ordered pre-cut kerfing.    


Here's a picture of the back being glued on. I need more clamps, but they're not cheap. I had these spare bricks laying around. I've got the cardboard cutout of the shape over the body to protect it. This worked just fine.


Here is the guitar hanging in my shop drying with a few coats of shellac. 


 Notice that I taped off the area where the bridge will be glued on later.  I wish I had done that with the fretboard too instead of gluing it on before finishing.  The veneer on the headstock is a burly maple that I got at Hardwood Heaven.

Monday, April 11, 2011

Lessons Learned on First Guitar Build

Here are a few of the lessons I learned while building the first guitar.
  • If you soak the wood for about an hour before bending, it's easier to bend and there's less scorching.
  • The sides should be about .09" thick.  1/8" (.128") was too thick.
  • Start with a piece that's longer than you really need so that there's some excess at each end.  This will make it easier to bend the curves at the end, especially on the upper bout.  I had problems getting the ends of the upper bout to bend. As a result, they didn't come together smoothly and the neck joint has a big gap between the neck and the body.
  • Do not mark and cut the ends until you've put them into the form.  Clamping into the form will stretch them some more.
  • Let the sides set in the form for several days.  If you don't, the wood will relax and lose some of its bend as it cools (and dries if you soaked it).
  • Make a small form of just the inside of the waist.  This can be used while bending the waist so that you don't have to keep moving back and forth to the full form.  It might also keep me from applying too much pressure and cracking the side.
  • Insert the frets before gluing the fretboard onto the body.  It would be a lot easier to clean up the ends with a file without having to worry about the finish.  I especially had problems where the fretboard was over the body because I couldn't get the cutters in deep enough to cut well.
  • I could use a better saw for cutting fret slots.  Although a good saw is about $20 to $30, and LMI will slot a fretboard for you for $9 (at the time of this article), so if I'm ordering the wood from them anyway, it would be cheaper to do it that way.
  • Apply the finish before installing the fretboard.  Be sure to mask the area where the fretboard will go.  I did this for the bridge and wished I'd done it for the fretboard too.
  • When masking the area for the bridge and fretboard, allow the finish to overlap into the area where they'll be glued by about 1mm.  This will help hide any imperfections of the edge left when removing the tape.
  • On the first guitar, I extended the fretboard over the sound hole and then cut it to match the radius of the opening.  This leaves the ends pointy and, unless perfectly centered, they come out uneven.  On the next one, I think I want to make the end either square (tangent to the opening) or convex.
  • Speaking of "perfectly centered", I need a better way to position the top and sides while gluing.  I had marked the outline on the outside of the top and cut it slightly big  (you can always sand extra off -- you can't put extra back on).  However, this meant that I couldn't see the lines at all on the inside, which is what is visible when gluing. As a result, the sound hole is slightly off-center.  Just marking the centerline on the back of the top might help.
  • Finishing requires lots of patience. The French polishing technique is relatively easy (search YouTube) and produces good results.  However, once you've finished one side, let the guitar set for several days for the shellac to harden.  I ended up transferring the texture of the rubber mat that I had on the workbench to protect the finish onto the back of the guitar and had to sand it out and refinish it.
  • Measure twice, cut once.  I had intended to place the 12th fret where the neck meets the body, but counted wrong and that was the 13th fret. As a result of this mistake, I had to move the bridge up so that it's not over the reinforcing piece on the inside.

Saturday, March 26, 2011

Status Update

I had a week off work, so I got to spend quite a bit of time working on the guitar build.  Not as much as I would have liked because of the missing band saw parts, most of which have still not showed up yet.  Here are some pictures:

I cut out the mahogany back with a coping saw and got the braces installed and shaped. The back braces have a slight arch to them to give the back a subtle curve. The strip running vertically is thin basswood.  It's light, but the grain runs perpendicular to the grain of the back.


Here are the top braces being glued in.  The clamping technique here is called a go-bar deck. (Be careful if you Google that or you'll find lots of go-go bars). I've seen lots of custom jigs for how to do this, but I just used a shelf over my workbench as the top.  The idea is to take flexible pieces of wood and wedge them between the top deck and the brace to be clamped.  This works pretty well.
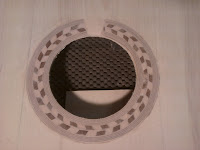

Here is the sound hole rosette installed. I was able to cut a slice off using a table saw.  I think it would be a lot easier to cut with the bandsaw once I can use that. The two vertical lines you see are where the panels are glued.  I wasn't able to get panels wide enough to do the whole top in 2 pieces, so I did it in thirds instead.  The glue joint is tight enough, but the yellow Tightbond glue left a dark line.  On the final build, I'm going to switch to a white glue that dries clear, at least for any joint that will show.

Here is the neck carved and ready to install.  I actually did this part before I started blogging about it.  The neck is maple, which is available locally.  The slots for the tuning pegs would be a lot easier to do with a drill press, but I don't have one so I used a brace and bit with a 1/2" auger bit.  This worked pretty well, but the bit slipped a couple times on the first slot causing it to be less straight than I would like.
When the switch guard for the band saw showed up, I was at least able to cut out the guitar shape on this form. I don't want to run it too much without the lower tire, as that will dull the blade.
The turnbuckles allow me to spread the blocks apart to press against the sides.  Note that the left side is in the form now.  If I were to make this again, I would leave the inside continuous instead of making it 3 pieces on each side. Or at least make the blocks on the lower bout bigger. When building this, I planned to replace the hook and eye that came with the turnbuckles with carriage bolts.  However, I forgot that one side of the turnbuckle is threaded backwards, so the carriage bolts won't go in.  I just cut a slot in the blocks and slipped the eye end in.  I may epoxy these in some day.

This is my side bending pipe.  I was trying to come up with a way of using an electric heating element to heat the pipe, but the smallest one I could find was 1400 watts, which comes out to about 12 amps. I wanted to use a light dimmer switch to control the temperature, but I couldn't find one rated for more than 1000 watts.  I settled for the small propane torch.   I bent one of the practice sides that I bought from LMI.  It worked pretty well, but you have to go slow and take it easy to avoid cracking the wood..  It also turns out that I need to fill the bottom pipe with sand or something.  Otherwise, the torch blowing across the opening makes it resonate like blowing across the top of a Coke bottle.  Of course, the guys at the organ shop who cut the sides for me will probably read this and say, "Well, duh!".
Additional update:  I bent the mahogany sides that they cut for me.  I should have asked for them to be thinner than 1/8" because they wanted to crack at the waist, but I managed to get them to bend without breaking.  The practice sides from LMI were only .09". Soaking the sides also helped.

Monday, March 21, 2011

Band Saw


I now have a band saw.  Home Depot had a 14" RIDGID  band saw, but the only one they had was the floor model.  It was $50 off and came pre-assembled, so I bought it.  In theory, this thing can resaw material up to 6" wide.  While that's not enough for backs and tops made the usual way -- joined in the middle -- it's enough to make them in thirds. It's also useful for sides and cutting out the curves.

The problem with buying a pre-assembled saw is that you're assuming that whoever assembled it was competent and didn't end up with pieces left over that they just threw out.  I got the thing home and found that there's supposed to be a little plastic key that goes on the power switch so that unauthorized personal can't turn it on. Of course, if it's missing, nobody can turn it on.

Fortunately, I found a site on the internet that had the part, and it's only 89 cents.  Shipping was $10.  So I ordered 5 just in case.

Having ordered that, I checked out the rest of the saw to make sure it was setup right and the blade aligned correctly and everything.  Found several other parts missing, including the lower blade guide and the rubber tire that goes on the lower wheel. Arg!

I went back to Home Depot and asked if they could look around to see if the extra parts were stored somewhere. They couldn't find them, but they gave me an extra $40 discount which covered having to order the parts.

Friday, March 11, 2011

Building the Rosette

I've been working on building the rosette that goes around the sound hole on the guitar.  This turned out to be a rather challenging thing to build.  The inner and outer rings are multiple layers of veneer alternating light (maple) and dark (gum wood).  I found the gum wood at Hardwood Heaven, a local supplier of hardwoods.  Unfortunately they didn't have much of a selection.  They had one flitch of a burly maple, which I bought, but decided that it looked too nice to use someplace where you wouldn't be able to see the figuring in it, so I'm saving that for something else.  I ended up using a package of 3/4" wide edge banding with a heat-activated glue.  This actually worked out pretty well.  

The form is a 4" diameter circle cut out of a 2x6 using a hole saw.  Since the outside diameter of this block is actually smaller than the sound hole will be (it's the inside diameter of the hole saw and the sound hole will be the outside diameter), I first glued a few layers of cardboard around it to build it up.

After gluing the inner rings, I tightened a couple of hose clamps around it and let it dry.  The center rings are made up of small pieces of wood.  I would have liked to have been able to cut these a lot more accurately than I did.  They're not as uniform as I would have liked. It also didn't occur to me at first that the ones on the outer ring would need to be a tiny bit wider to account for the fact that the circumference is longer.  The circumference of the outside of the ring is longer by 2 × thickness × π. If the pieces are 1/8" thick, that works out to more than 3/4".  Divide that by the number of pieces (45) and you end up having to make them just barely wider.  If you don't, the pattern will eventually not match up.  The angles have to be different too.  It's a 30° angle on one side and 35° on the other.  They had to be glued on a few at a time or else they kept shifting. Once the inside row was glued, I clamped it and stuck the whole thing in a 300° oven for five minutes.  This allowed the glue to soften and the clamps could be tightened some more.

Next I added the big carriage bolt you see in the picture and chucked the whole thing in a drill.  With the drill on a low speed setting, I held a rasp to it to smooth out the rough edges. Then I added another light strip (hard to see in the photo) and repeated the whole process for the outer rings.